Leather Tanning Process
THE TANNING PROCESS
Making leather is a complicated process. The easiest way to understand the tanning process of leather preparation is to understand the layer separation in which the leather is split across its thickness to produce a top layer (hair side) and the under layer. The top layer is called full grain and describes the side exposed to the elements giving it the durability and malleability it needs to be considered fine leather. The underside is much stiffer and less durable than the top layer. This is practical for use after a coating or treatment is applied.
The process of tanning involves five distinct stages: Pre-Tanning, Tanning, Selecting, Dressing and Finishing. Each one of these processes is complicated and requires many steps. The following is an outline of some of the more important points of each step.
Step 1: Pre-Tanning
Soaking – When the leather arrives at the tannery it may be soaked to extrude salts used in preserving leather. This is done in revolving drums which can hold up to 200 hides.
Liming – Hair and epidermis are removed and a solution of lime (calcium hydroxide) and sodium sulfide is applied to soften and enhance the hide for softness and flexibility needed for upholstery leather.
Splitting – The hide is split into layers. The top, or grain, layer will produce a fine, smooth grain leather. The bottom is used for suede or split leather for other uses.
Step 2: Tanning
This is the process which converts pre-tanned hide into leather.
Mineral tanning is normally done with alkaline chrome-3 salts. It penetrates the hide fairly quickly (24-48 hours). This results in a pale duck-egg blue, which, after processing, yields a fine, soft, modern finish. When there is absence of chromium tanning, other methods combine vegetable with polymers and syntans as an alternative.
Other tanning methods are:
- Pure Vegetable Tanning
- Synthetic Tanning
- Oil Tanning
- Combination Tanning
(more information on these tanning methods are in the glossary)
Step 3: Selecting
After tanning, excess water is removed from the hide. Hides are then graded according to the quantity and locations of natural features and flaws. Aniline and Nubuck leathers demand the best quality hides. Heavily coated or embossed leather can utilize a lesser quality of hides.
Step 4: Dressing
Dressing the hides involves the following:
- Shaving – Hides are given a uniform thickness.
- Dyeing – Dyes are added to color leather.
- Re-tanning – Additional tanning substances are sometimes added to modify the physical characteristics of the leather to suit its final use.
- Setting – A process which mechanically removes creases and excess water.
- Drying – The hides are stretched dried on large frames or vacuum dried.
- Trimming- The rough and ragged edges are removed.
Step 5: Finishing
The purposes of finishing are:
- To minimize the appearance of grain blemishes without losing the natural beauty of the leather product.
- To give the required degree of gloss.
- To ensure the leather is soft, malleable and moldable.
- To give a more protective surface.
- To provide a surface that can be easily cleaned.
- To give special effect such as an antique look.
The finishing process uses a combination of surface coating techniques such as padding, spraying or roller coating. Then there are mechanical processes such as buffing, staking and embossing.
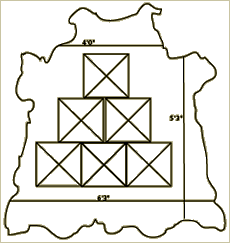
HIDE DIAGRAM
Leather is priced and measured in square feet but is sold by the hide. Hides are irregularly shaped (see below) which must be taken into consideration when translating fabric (COM) to leather (COL). There are normally 13.5 square feet in each yard of 54″ wide fabric (54″x 36″). The factor used to translate to leather is 18 x (number of yds.) (ex: 3 yards of 54″ wide fabric x 18=54 sq.ft.). This difference provides for the irregular shape of a hide and flaws inherent in all genuine leathers.
Hide Diagram A & B shows full grain leather mature Bovine average hide 50 – 60 sq. ft.
Hide Diagram C shows a hide of a young Bovine, soft, supple and very fine grain average hide is 25 – 30 sq. ft.
Hide Diagram D is a typical 48 – 50 sq. ft. cowhide.
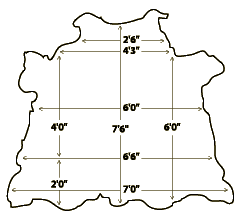
There is normally about one-third loss due to the irregular shape and flaws inherent in genuine cow hides. You will not always get clean cuts of these dimensions. Flaws of nature will be visible in some of the above dimensioned areas.